Hi, friends. It’s been a few weeks since I started my heirloom garden, and I’ve got an update for you! I’ve definitely learned a few new lessons from trying to start my own seeds. I failed miserably the first time, but the second time has been more successful.
Round One: Failure
The first time I started seeds, I just used a paper egg carton—I had heard somewhere that it could work for starting seeds. So I just grabbed some potting soil, filled the carton, and carefully placed one seed into each section. Then I watered the entire thing, placed it in front of my sliding glass door in direct sunlight, and…
Nothing. Big-time fail.
I’ve never started seeds before, and I learned a few crucial lessons from what I will hereafter refer to as my "practice round."
Round Two: Success!
Before starting round two of my seedlings, I downloaded some seed-starting instructions from the internet, and I got a couple of really inexpensive seed starting kits (like mini countertop greenhouses) at a local hardware store. They were around $3.00-$5.00 each, and they have worked perfectly so far. I highly recommend getting something similar. The ones I bought aren’t reusable, but you can buy kits that are re-usable if you will be starting seeds every year.Just follow the directions on the kit, and after only a few days you’ll see some lovely little green shoots sprouting up from the soil. Once I did it right, I was surprised how quickly I saw things happening—which is great for me, because I’m not the world’s most patient person.
On the front of each kit I wrote a number and the word "Front," and on a piece of paper I drew a little diagram of which type of seeds I planted in which pellet. That way I could ensure I didn't transfer onions thinking they were peas, or cucumbers thinking they were zucchini!
 |
| I numbered and labeled the front of each seed starter kit so I would know which seedlings were which . |
The basic steps were as follows:
- Moisten the soil.
- Loosen the top of the soil.
- Place 2-3 seeds in each soil section and cover loosely with soil.
- Cover with lid (provided in the kits I bought).
- Keep in a warm place out of direct sunlight.
- Keep moist.
- After the first seedlings sprout up, keep the lid propped partially open, and keep the soil moist.
 |
| After just 2 or 3 days! |
 |
| These soil pellets are great for novice gardeners like me. |
Once the seeds all sprouted, I was surprised how quickly everything grew.
See? Aren’t they great?
 |
| All the seedlings reaching toward the sunlight through the windows... |
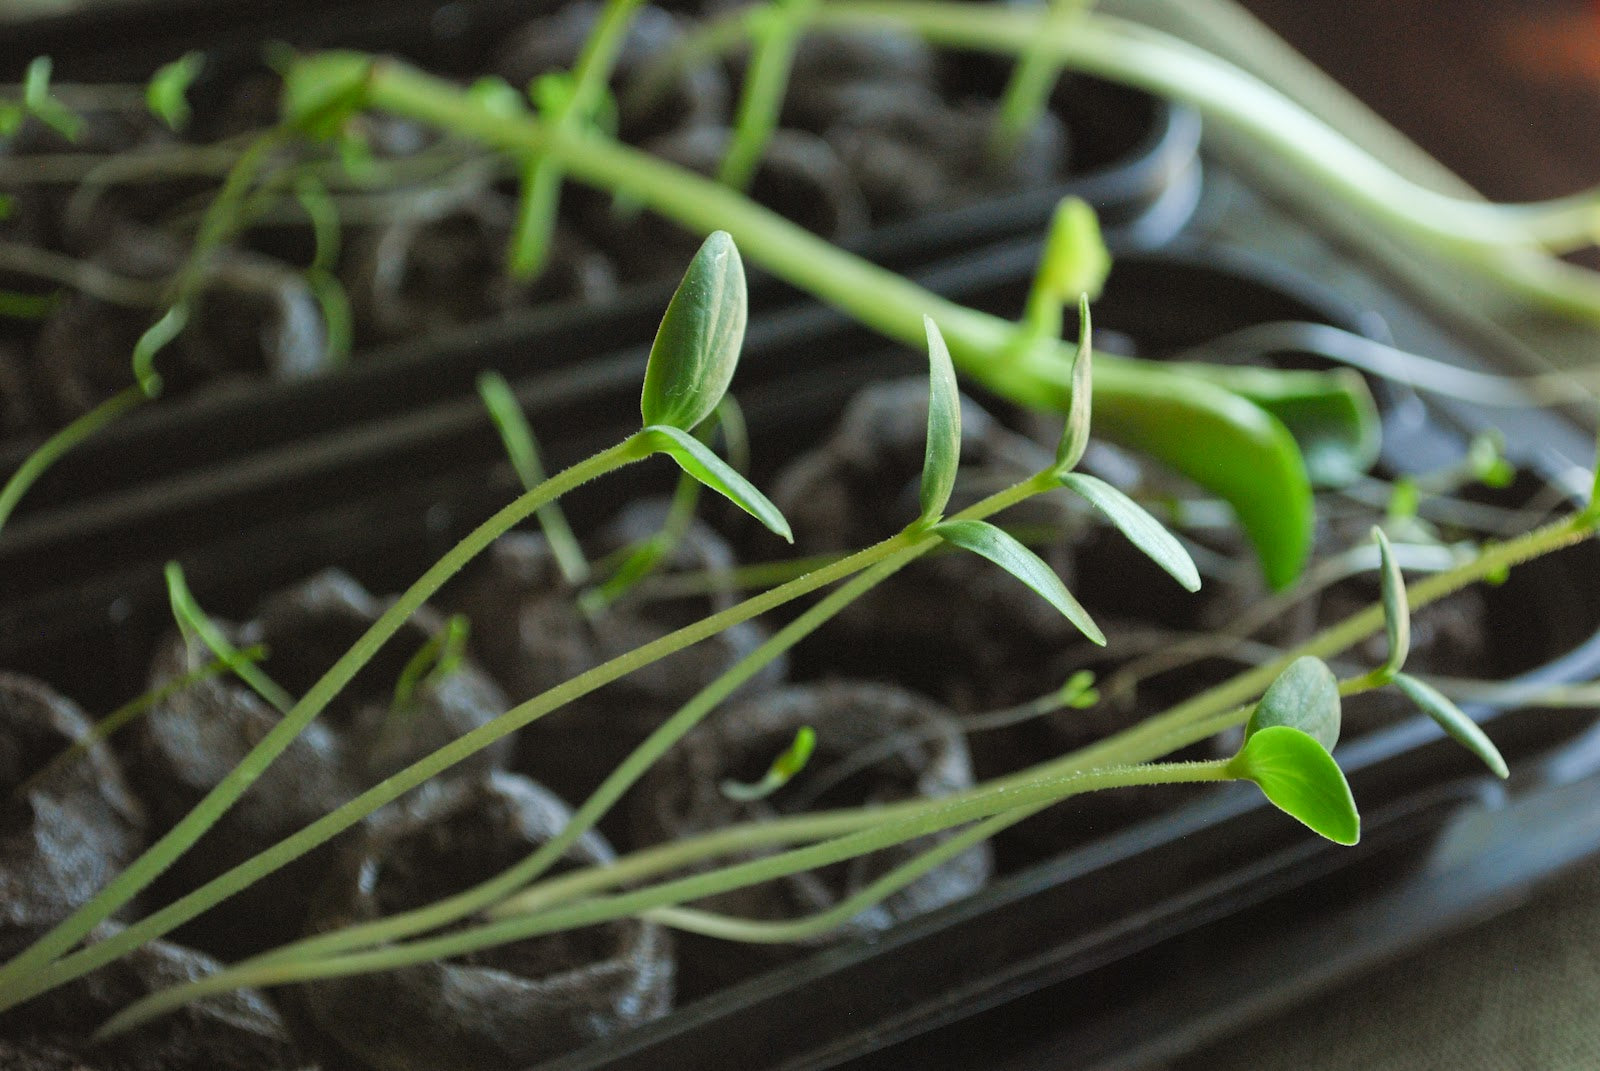 |
| The zucchini, peas, and cucumbers grew the fastest! |
If you don’t want to do a starter kit, you can Replace a similar container, use good soil for starting seeds, be sure to keep the container out of the direct sunlight, and keep the soil moist. After the initial soaking of the soil based on the kit instructions, I sprayed all of the seeds twice a day with a regular spray bottle of plain water and added about a cup of water from a measuring cup into each kit when the soil turned light brown instead of dark brown. For me, spending the few extra dollars on a kit was worth it to make sure they worked the second time—but you might be braver than I am!
So the next step will be to actually transfer these to pots or to the ground—any tips for me? Let's hear it in the comments with your tips and your own gardening adventures!
--Urban Girl (Sarah)
17 comments
KylaGWolf
Something else to keep in mind when you do get ready to plant them make sure to make the transition to the outside gradual. We had fail at this point last year when the plants fried when we moved them outside. We have a good start on them this year just hoping to actually get them in the ground this year.
Emergency Essentials®
Thanks everyone for your comments and suggestions! I need to write this all down so I can remember it next time I start seeds.
—Sarah
lfhpueblo
Next tip, you can use quart size ice cream containers, like the Dryers, or Bryers type to plant your seeds in if you're starting them indoors. Put in good seed starting soil (buy at a garden center). Leave a few inches empty at the top. After planting the seed and watering in, use plastic wrap over the top and a rubber band to secure it. That way you can reuse the same piece of plastic wrap after you take it off for rewatering. Make sure the empty ice cream container has been throughly washed out with soap and water, rinsed, dried. Then take and punch some holes in the bottom, an ice pick works well for doing such. Then you'll have to put the container in a tray of some sort that wouldn't let water leak through. I actually used some ceramic pie pans for the drip pans. You might want to start tomato's or cucumbers in these, so they can grow larger than the seedling trays that do multiple seedlings. I do have those trays, but I found I think plants do better in larger containers. Just start them sooner indoors, so they are bigger when it's time to plant them outside. This probably isn't needed in warmer climates with longer growing seasons, but where I live we really need to start most things indoors and then transplant outside.
lfhpueblo
You might like to have a fan placed a few feet away from them blow on low, so the stems get stronger. Otherwise when you transplant them outside and they are exposed to maybe a wind gust, they could bend and break. Some plants don't transplant well, and should actually be started in the soil outside when it's warm enough.
Beth
I use empty yogurt cups as we have many each week and they are a sturdier option than some of the clear plastic containers. I put holes in the bottoms with nails and label them with marker so I can distinguish different types of peppers, tomatoes, etc. I arrange the cups in large plastic flats to make transportation easier. It makes it easy to put them in the soil as they form decently deep roots.
Anonymous
To stuckinnac, who said, "I am new at gardening, but I've learned a LOT this year. … I just ate my first radish yesterday and had my first peas today."
Nothing like the sweet taste of success! Peas right off the vine — mmmmm, so yummy! You'll be hooked on the taste of home-grown food.
It's really worth the effort. And once you know how vegetables are supposed to taste when they're really fresh, it's amazing how stale and flat the veggies from the supermarket seem.
stuckinnac
I am new at gardening, but I've learned a LOT this year. I started with tomatoes because where I live they grow really well. I bought Miracle Grow potting soil and asked Lowe's for any empty trays that they had. If you go to Lowe's or Wal-Mart in their gardening section they are usually trying to get rid of pots or trays from plants that are not doing so well. I used some small trays to start my seedlings on and then when I had small plants I transferred them to small pots, and then transferred again to larger pots as the plants grew. It was a little bit of a pain, but I am renting and will be moving in the middle of the summer, so I cannot plant my babies in the ground. My plants have done really well. I have learned that I have to water them in the morning before the sun and then after the sunlight is off of them. Watering twice a day is a necessity to make sure they are healthy. I did make the mistake of not labeling the seeds at first and had to learn as the plants grew which ones were which. I loved being able to tell the cucumbers from the smell of the roots. I have some friends that have gardens and I use my library as a constant source for gardening books. I just ate my first raddish yesterday and had my first peas today.
Emergency Essentials®
Shasta, I love that idea!! I buy grape tomatoes and blueberries all the time—so I've always got some of those containers in the fridge. Thanks for suggesting that!
—Sarah
Shasta
I have also used the clear plastic containersin which grape tomatoes are sold. They have openings in the bottom to drain excess water and you can close the lids to create a terrarium effect. Plus they are free with my tomatoes!
Good luck!!
Emergency Essentials®
Thanks for your comments, Fran and Liz! I wondered about rotating them, but didn't know if it would make a difference—now I know!
Liz, I was going to start hardening them off today—I read that they should spend time in the shade first outside, so I'm going to try to find a shady spot for them to spend a couple of hours.
—Sarah
Anonymous
Instead of buying a kit and spending money on the tray, I use the clear plastic clamshell boxes that bakery goods come in from the grocery store. They provide the same function as the fancy tray, but are free and allow me to keep them out of the recycling bin. I just poke a couple of holes in the top to allow the plants to breathe and excess moisture vapor to escape. Reusing & repurposing items doesn't cost energy; recycling does cost energy.
I sometimes use the little seed starter pods similar to the ones that came with your kit, which can be purchased at a nursery or garden center. Sometimes I use peat pots. Sometimes I make newspaper pots. They all seem to work just fine.
Plant the seeds, water, and rotate the container periodically. Allow the seedlings to spend some time in the container outside so they get hardened off, then transplant outside.
Good luck on your garden. I enjoy reading your posts.
Liz
Anonymous
Hi,
Because your seedlings are all leaning in one direction, you need to turn your trays every other day so the seedlings will be straight. Your seedlings are straining for sun. They will be tall and thin instead of short and stocky. You want stocky plants not spindly plants. You may want to put them under grow lights. Transplant them fairly soon. Tomato seedlings can be transplanted deeply. Theyngrow roots anywhere along the stem.
Otherwise, you are doing a great job!
Fran
Emergency Essentials®
Stacy, aren't you glad people mention these things? I really wouldn't have ever thought of it.<br /> Anonymous, good luck! I hope it works well for you!
@lynn, aren't you glad there are experts that are willing to help out newbies like us? I sure am!
—Sarah
lynn
I also did this – this year! I was so excited when they reached 4 inches and needed to transplant I followed all the directions – placed them out side for 2 hours a day for a week then 4 then they were ready and doing super good! I had the largest plants around! 1 week after they were planted in the ground they died!! I was so upset! ok so lesson learned I live in a windy area and the pod's can be used but directly in the ground so the seed grows strong and use to the elamites as it grow's! Now I have watermelon, corn, onions, peppers cantaloupe and pumpkins growing like crazy directly from the ground… @ lfhpueblo you were correct! Thank you!!
Anonymous
Bravo to your success and thanks for the great info. I just bought some of these starter kits at Wal-mart on clearance for a $1. I was going to try them, so maybe I will be successful the first time thanks to you.
stacy
Water storage or the garden is something I need to think of in my area. We have a dry spell from
June through September.
Emergency Essentials®
@ Frances – I have emergency water storage for my own needs, but it never occurred to me to have water storage for my plants. Hmmm… that's some food for thought.
@KylaGWolf – Good luck with your garden! I hope my little starters end up working, too.
—Sarah