If you’ve been following our Baby Steps series, you should be ready to plant your garden. You can start with seeds or seedlings and these baby steps will tell you how.

Plant seeds. Many gardeners in the US started their seeds indoors to maximize the growing season. If the ground is warm enough you can start your seeds in the ground. Now is a great time to plant peas if your ground temperature is at least 40° F/4°C. Other plants like squash need warmer ground of at least 60°/18° C. A garden thermometer can determine the ground temperature for you.
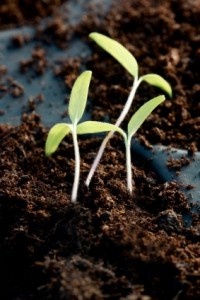
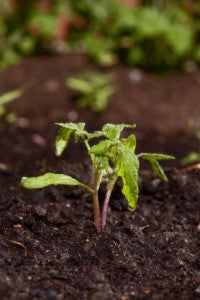
Smaller seeds can be planted in bunches. Not all the seeds will sprout so don’t worry about “overpopulation”. You’ll thin them out after their first true leaves have grown. (See the images below.) Larger seeds, like corn, should be planted individually. Dig about 1.5 to 2 times deeper than the size of the seed, and cover with soil, then with a board until the seedlings come up. If you’re planting corn, make sure to plant the seeds deeply enough. Click
here to read more in an article by North Carolina State University.
[caption id="attachment_4970" align="alignleft" width="200"]

Don't pull these cotyledons out! Wait until the seedlings have sent out true leaves.[/caption]
[caption id="attachment_4994" align="alignright" width="200"]

Thin seedlings if there are multiple seedlings bunched together and they have true leaves.[/caption]
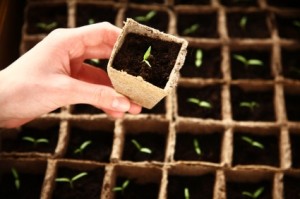
Plant (or transplant) seedlings. Has the last frost date passed? If so, it’s time to transplant your seedlings!
First, you’ll need to
harden off the seedlings. This technique takes about a week and acclimatizes seedlings that have been grown indoors in a consistent temperature and light exposure. Put your tray of seedlings outside in the shade, but bring them inside if it’s still cold at night. Then gradually work them into half sun/half shade, then full sun, and then plant them in your garden. This keeps your seedlings from going into shock, which would cause early plant failure.
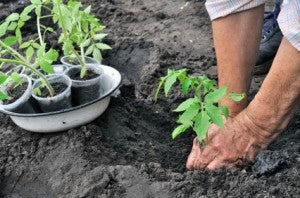
When you’re ready to plant the seedlings, loosen the soil and prepare the plant rows or holes. Let’s use tomatoes as an example. Dig a horizontal hole if you have space (
watch this video). Or stick with the more common vertical hole. Carefully take the whole root system out of box – don’t loosen the roots too much. Leave it in tact and bury up to the leaves. Sprinkle with water.

Nurture seedlings. Your transplanted seedlings need a little TLC so keep an eye on them for the first couple of days. Make sure that their soil is moist, but not mushy, and keep them shaded from the hot sun.
You can further strengthen the seedlings by gently running your hands across them. Thanks Gardening Life for the tip!
We're glad you've started gardening. With a garden you’re well on your way to providing delicious food storage, not to mention being more self-sufficient.
If you’d like more detailed information click on any of the links below.
Let us know how your seeds and seedlings do, and happy gardening!
Planting Seeds
Planting Vegetables from Seeds and Seedlings
Seed Starting
Nurture Seedlings on a Tiered Growing Stand

 Don't pull these cotyledons out! Wait until the seedlings have sent out true leaves.[/caption]
[caption id="attachment_4994" align="alignright" width="200"]
 Thin seedlings if there are multiple seedlings bunched together and they have true leaves.[/caption]
Plant (or transplant) seedlings. Has the last frost date passed? If so, it’s time to transplant your seedlings!
First, you’ll need to harden off the seedlings. This technique takes about a week and acclimatizes seedlings that have been grown indoors in a consistent temperature and light exposure. Put your tray of seedlings outside in the shade, but bring them inside if it’s still cold at night. Then gradually work them into half sun/half shade, then full sun, and then plant them in your garden. This keeps your seedlings from going into shock, which would cause early plant failure.
When you’re ready to plant the seedlings, loosen the soil and prepare the plant rows or holes. Let’s use tomatoes as an example. Dig a horizontal hole if you have space (watch this video). Or stick with the more common vertical hole. Carefully take the whole root system out of box – don’t loosen the roots too much. Leave it in tact and bury up to the leaves. Sprinkle with water.


2 comments
Cengiz
they never made it out of the basement, I, um . . . tlcenicalhy, they made it out, in a plastic bag, and are now presumed to be in a landfill. They started to fall apart around late May, and I wasn’t able to keep up with the watering, so.
Emir
x 16 , 6 6 round tubs andf all the 58 row middles beteewn those raised beds. Oh don’t let me leave out the four 40 rows of beans. along with 12 2 ‘round x 6 hjigh tomato cages I over did it. This fall I’m cutting back I couldn’t give all the vegetables away, Go FIGURE . Going bact to my 6 raised beds, ^ 6 tubs and 6-Tamato cages.thta’s nall I need. II thank you for all the e-mails Grady