Now that you’ve learned how to pick a Dutch oven for outdoor cooking it’s time to learn how to prep it and cook with it! Dutch oven cooking has become almost an art for people like Byron Bills and also for Archie and Linda Dixon, authors of
Don’t be Afraid of Your Food Storage . . . Just Dutch It! As converts to Dutch oven cooking, the Dixons are living proof that even a beginner can master Dutch oven cooking.
Cooking without electricity is a very important skill to have for your emergency survival. Since Dutch oven cooking is a delicate process, let’s talk about how to prep your oven and how to cook with it, so you can become a Dutch oven cooking master!
Prepping Your Oven: How to Season Your Oven
You can buy pre-seasoned cast iron Dutch ovens, skillets, and griddles. If you choose to season your own, you can follow the steps below.
Cast iron must be seasoned before use by having shortening, bacon grease, lard or certain vegetable oils rubbed into the inside and outside surfaces and baked on. Some vegetable oils become sticky, so choose a good oil. The best choices for seasoning cast iron are flaxseed oil, soybean oil, and canola oil. A good explanation of why can be found in this informative article by
Sheryl Canter. She also includes great steps for getting a nice seasoning on your pan. It’s more involved than the steps below, but seems to give fantastic results.
A cast iron oven that has been properly seasoned and cared for can last for generations. Seasoning is a much more intricate process than merely rubbing a couple of oils on and calling it good. Follow
Sheryl's process or the Dixon’s tips for preparing your new oven:
- After washing out your oven with warm water, wipe the dry oven and the lid all over with a lightly oiled paper towel or cotton cloth while the oven is still warm. After oiling the Dutch oven, place it in your kitchen oven on the bottom rack at 350 degrees with lid ajar. Bake one hour.
- You may get strange smelling fumes so turn on your kitchen fan and open a few windows (This process should be done before there is an emergency, ie. No power). If you can’t use your kitchen oven and have a barbeque with a lid, you can use that instead.
- Once the Dutch oven has cooled down, remove it, oil it, and bake it again. Leave it in the kitchen oven until warm, remove it, then oil it lightly one more time. Your oven is ready to use.
- Your oven will turn a golden color, but after you use it several times it will have a black shine. If your oven rusts, scrape off the rust with steel wool, and repeat the oiling process again.
Cooking Your Food with Charcoal
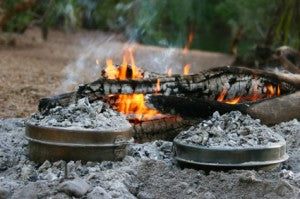
- Use good quality briquettes and place hot charcoal in a circle (rather than a pile) under the oven, so air can circulate. Place briquettes in a checkerboard pattern on the lid. Avoid bunching coals either under or on top of your oven, as this can cause hot spots and possibly burn food.
- To attain certain temperatures in your oven, add or remove hot coals to the lid and under the oven. For example, to achieve 350° F., use a ring of very hot coals under the oven (about 3-4 between each leg) and place briquettes in a checkerboard pattern on lid (about 15-16). Check out Prepping to Survive’s advice on how to heat a Dutch oven to 350 degrees. Since this is not as exact a gauge as your kitchen oven, you may need to learn by experimenting with the number of coals and checking your food as it is approaching the time when it should be done. Some experts have learned to test the temperature by counting how many seconds they can hold their hand over an open oven!
- To roast food, place an equal number of coals above and below the oven. To simmer soups and stews, place 1/3 of the coals on the lid and 2/3 below the oven. Several ovens may be stacked (largest on the bottom) with coals on top of each oven.
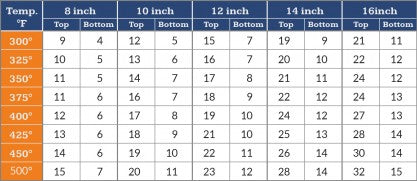
Use this temperature guide can help you determine how many coals you will need to heat your Dutch oven to a specific temperature.
Using your Oven to Bake
For baking, either obtain a baking rack for the bottom of your Dutch oven or make one very simply by tightly rolling an 8-inch sheet of aluminum foil like a snake, then shaping it into a ring or coil and flattening it slightly. If you are baking a pie, breads, or anything with that uses a dough, place the dough/crust in a loaf or pie pan and put the pan into the Dutch oven. Make sure that you either use the aluminum coil or a slightly flattened foil ball to place the loaf or pie pan on so that the bottom of your pan does not sit directly on the Dutch oven. If your pan does sit directly on the floor of your Dutch oven, the bottom of your baked goods will burn.
Other Helpful Tips and Tricks
- Never pour cold liquid into a very hot oven—it will crack.
- Don’t allow cast iron ovens to soak in water—wash quickly in hot water (no soap) and dry with a cloth, then re-season. (Some suggest placing it over heat again for 10-20 minutes to dry out any remaining moisture before rubbing down with oil and storing).
- Don’t place an empty cast iron oven over a hot fire—use coals
Now that you know how to prep and cook with your Dutch oven, check back tomorrow for the next installment in our Dutch oven mini-series, “
Dutch Oven Recipes—Breakfast.”
Check out the rest of our series:
Dutch oven Basics Part One: Picking Your Oven
Dutch oven Basics Part Three: Breakfast Recipes
Dutch oven Basics Part Four: Sides and Main Dishes
Dutch oven Basics Part Five: Desserts
Chart Source:
http://www.socaldos.org/dutch_oven_chart.htm

2 comments
Annie
This post is great ! Interesting read i like the way you explained about the Dutch Oven Basics it’s very helpful for me .
Bob
This is way too much for some high schoolers to write dang