Paracord is a great addition to any emergency kit. It was originally used as parachute suspension cord during World War II. Since then, hikers, campers and other outdoor enthusiasts have praised its versatile uses in emergency situations. Paracord can easily be woven into bracelets, belts and other compact wearable items. It can later be unraveled and used for any number of emergency applications. A common, commercially-available paracord is known as “550 Cord,” which means it has a minimum breaking strength of 550 pounds. This heavy-duty, yet lightweight, nylon military grade rope has 7 inner yarns made up of 3 strands. It can be purchased from online and retail stores in a variety of colors. I bought 100 feet of pink paracord for only $10 at a local military surplus store.
[Editor's Note: You can also purchase from Emergency Essentials by clicking here.] Here I will teach you how to make a survival bracelet using a total of 10 feet of paracord. At a cost of only about a dollar a bracelet, this is a great activity for scout troops, church groups, and families. As an additional activity, see how many uses you can think of for the paracord or its inner yarns and strands. You will need a 2-foot long piece and an 8-foot long piece of 550 paracord. You will also need a pair of scissors to trim the ends and a flame to singe the ends to keep the cord from unraveling. Singe the ends before you start. You can use a lighter, candle flame, or flame from a gas stove – just be careful not to burn yourself! You can view the attached photos for help with each step. Step 1: Begin with the 2-foot long piece. Fold it in half and tie an overhand knot with the two loose ends. Wrap the doubled-up cord around your wrist and slide the knot through the loop (see Image 1). You should be able to fit a finger between the cord and your wrist. Adjust the length accordingly.
Step 2: Place the 8-foot long piece of paracord in front of you horizontally. Place the base cord, with the loop at the top, over the middle of the 8-foot cord, forming a “T” shape.
Step 3: Make a cobra knot. Do this by taking the right end of the 8-foot piece and bring it over the top of the base cord, like a “Z” shape.
Step 4: Take the left end of the 8-foot piece and thread it down through the loop on the left side of the base cord. Weave it under the base cord and up inside the loop on the right. Pull the cord tight. Be sure the overhand knot will fit through the loop you’ve just created at the other end of the base cord. Adjust the loop as necessary.
Step 5: Next, starting with the left piece, reverse the process by first making an “S” shape instead of a “Z” shape.
Step 6: Finish reversing this step by bringing the right end of the cord down through the loop on the right side of the base cord. Weave it under the base cord and up inside the loop on the left. Pull the cord tight.
Step 7: The first cobra knot is now complete! Continue making cobra knots until you are about a quarter inch from the overhand knot.
Step 8: Check the fit by pulling the overhand knot through the loop at the other end. Adjust the knot to fit your wrist. The bracelet should fit snugly without being too tight. Trim the ends again and singe them again as needed. (There is no need to knot them as long as you have pulled the cobra knots tight and flattened the ends after singing them so they don’t slip back through and loosen on their own.)
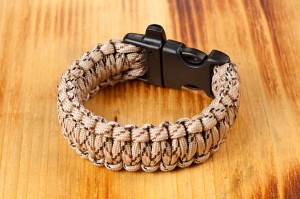
To wear your new survival bracelet, simply pull the overhand knot through the loop around your wrist. To use the paracord, just unweave the bracelet. As a variation, you can add a buckle or button. You can also use longer lengths of paracord to make an ankle bracelet, belt, pet collar or leash! --Carolyn, CA
Urban Girl says: I made a bracelet following these instructions, and it actually worked! I didn't doubt Carolyn, but more my ability to follow the instructions. However, they were very clear once I got started and had the paracord in front of me. I increased the size of my overhand knot (it kept slipping out of the loop). I created a normal overhand knot, but before tightening it, I took one of the loose ends and re-looped it through the knot. It increased the size of the knot just enough to keep it in place. Stay tuned—we’ll be back soon with more ideas for using paracord. Thanks, Carolyn!
6 comments
Brad Nierenberg
I remember making these as a fundraiser in college, but I’d completely forgotten how to do it by now. They really come in handy, because it doesn’t add any bulk or weight – just wear it around your wrist. Great to have in case of emergency. Thanks for the tutorial! I found my next weekend project.
Eric Burns
Nice. Going to try it this weekend.
swarovski beads
This post is very good, I like it, thanks for sharing! swarovski beads
Anonymous
Paracord is the best tool for your survival kit. I have used it countless times when I've been camping. You never know what you need extra rope, like to tie down a tent or for crabbing.
You can even get shackles and other accessories to aid in the survival.
http://www.mrparacord.com/accessories/
The shackles are better because they can hold more weight and withstand weather conditions better than the plastic buckles
emergency preparedness plan book
Hi, I would like to ask how to use the cord? And what is the standard length?
Anonymous
You would be surprised. One time when camping in the desert. I was riding my quad and found a person stranded as their dirt bike broke down. I was able to use mine to tow them back to their camp site. The strength of these things are stronger than they seem. You never know what you may use it for or when it may come in handy. A lost dog or a random tow. Who knows but at least you have something when the time arrives.